Automate React Native Deployment - Part 1
May 06, 2019
I’m a fan of React Native. It allows me to build native mobile apps using JavaScript. That’s no small feat, but no tool is perfect. React Native has its frustrating quirks and time-consuming challenges, as any library as heavy as React Native might. Automating deployment has been one of those challenges. I’ve fiddled with deployment processes across several projects over the years and I was never really satisfied with the results. It took many iterations: adding new tools, removing stale ones, using old tools in new ways, but I recently realized that I reached my goal.
I should point out that I didn’t create some silver bullet to the deployment problem. I am simply using existing tools in intended, documented ways. Look at any individual piece, and there’s nothing original. What I believe is special, and what I am excited to share, is the way the tools are combined to form a seamless, single-command, automated deployment process from commit to app store.
Part 1 will establish some project assumptions that are required for this process to work, and then walk through the first half of the setup. This is meant to be an example of what is possible. Some of these tools have alternatives that would be relatively easy to swap–such as Circle CI with pretty much any other CI–but I’m going to stick with what I used and maybe you can take it from there.
To see everything put together, check out the working example repo with all code samples.
Bird’s eye view
When this series is complete, you should have a working deployment flow that runs with one command: yarn release (or npm run release). Here’s an overview of the whole process:
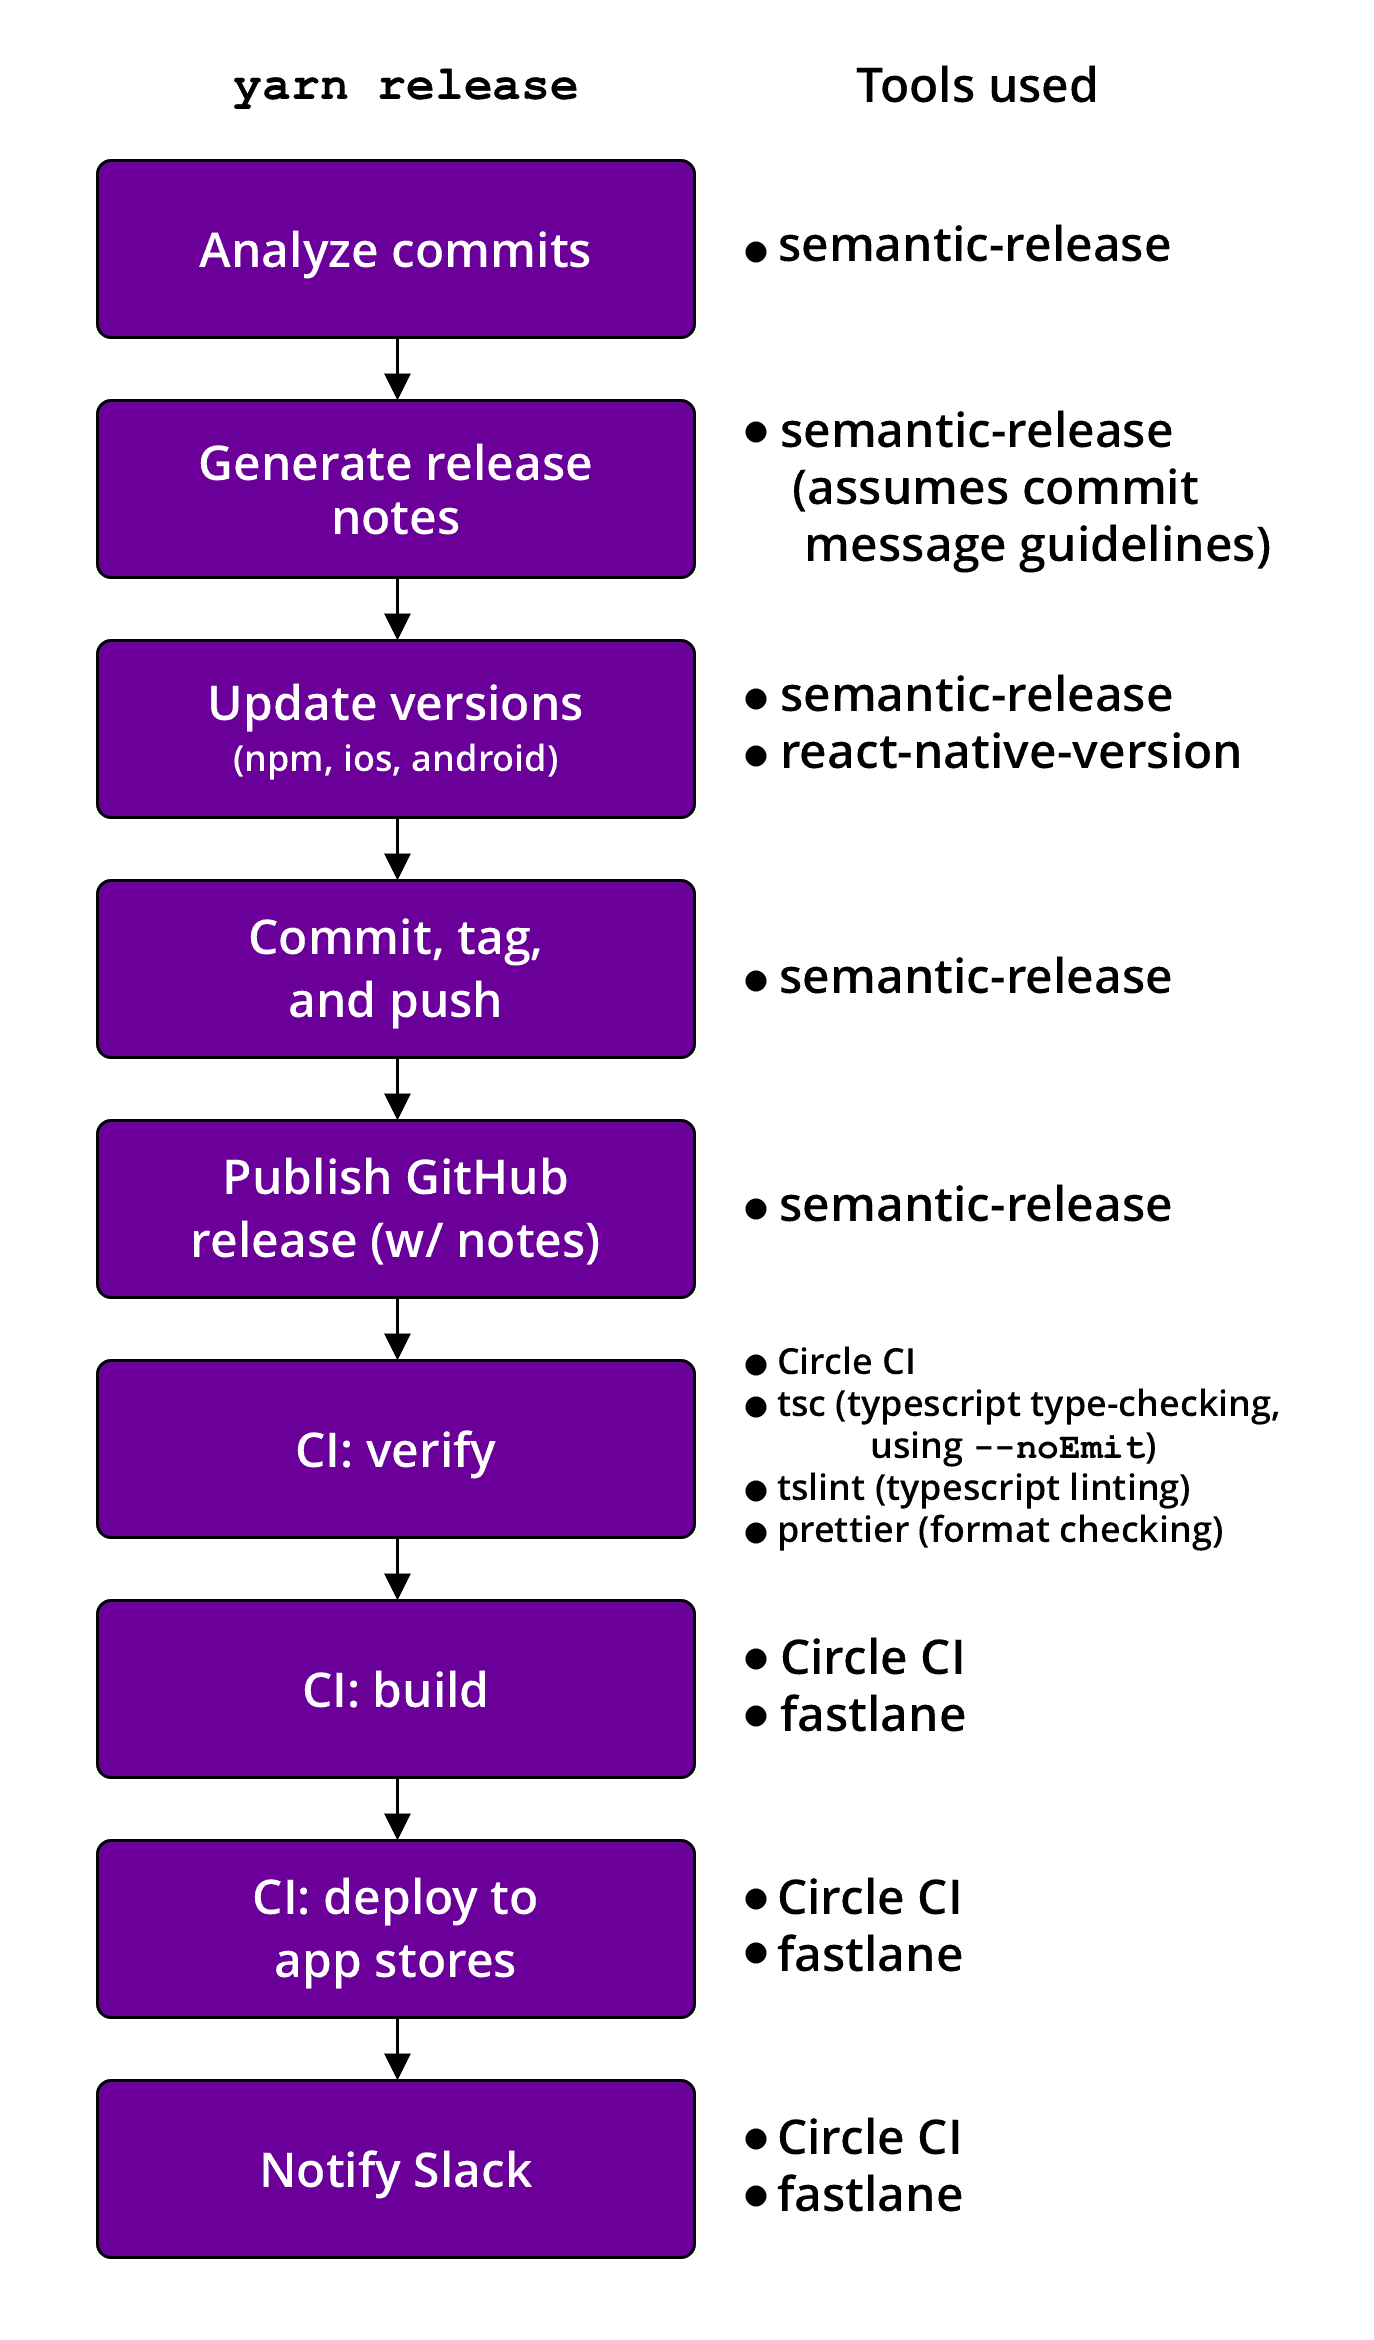
Note: e2e testing is not part of this flow. It assumes the previous commit has already passed all tests. Setting up testing for supported devices in CI is another beast. I may share that in a later post.
You know what happens when you assume
This workflow assumes some things about the project. It assumes you have a project structure similar to mine. That is, similar to the one generated by react-native init. Most of this should work in an expo project, but I haven’t used expo that much so I can’t say for sure.
Commit message guidelines
The critical assumption is that all commits for the release follow some commit message guidelines. This is necessary for determining a proper semantic version and generating release notes from commit messages.
You’re not tied to the format I use, but each commit should at least have a scope, a subject, and some keyword to denote a breaking change. There are several possible presets. Have a look at @semantic-release/commit-analyzer for the possible configs. I also recommend checking out commitlint and husky for enforcing commit message guidelines on commit. commitizen is nice if you’d like a prompt to use when committing. The config I use for this blog is available on my GitHub. Check out the package.json and commitlint.config.js
[TypeScript]
It’s not necessary that you use TypeScript, but a few of my code examples will use the TypeScript compiler and tslint. You could swap those with tools such as eslint. prettier works with both TypeScript and Vanilla JavaScript.
Dependencies for part 1
$ yarn add --dev \
semantic-release \
@semantic-release/git \
react-native-version
Setting up semantic-release
Add this script to your package.json:
"scripts": {
  "release": "semantic-release"
  ...
}
Next, double check git authentication, which involves setting some environment variables. Then create a GitHub token for semantic-release-bot. The @semantic-release/github docs explain how to do this. Specifically, follow this guide and set GH_TOKEN in your environment. The token will allow the semantic-release-bot to use the GitHub API to push release notes.
Here’s an example config to use for semantic-release.
Replace $PROJECTNAME with your own project name.
"release": {
  // Release from this branch
  "branch": "master",
  // This isn't an npm package
  "npmPublish": false,
  // We're initiating the release from
  // our local machine. You could set this
  // to true and set up releasing on every push
  // to the release branch, but I like
  // pulling the trigger myself.
  "ci": false,
  "plugins": [
    // Analyzes commit messages and
    // determines the version
    "@semantic-release/commit-analyzer",
    // Builds release notes from commit messages
    "@semantic-release/release-notes-generator",
    // Updates the version
    "@semantic-release/npm",
    [
      // Commits, tags, and pushes
      "@semantic-release/git",
      {
        "assets": [
          "ios/$PROJECTNAME*/Info.plist",
          "ios/$PROJECTNAME.xcodeproj/project.pbxproj",
          "android/app/build.gradle",
          "package.json"
        ],
        "message": "chore(release): ${nextRelease.version} \n\n${nextRelease.notes}"
      }
    ],
    // Creates the release on GitHub
    // and posts release notes
    "@semantic-release/github"
  ]
}
Updating the version
There’s an important package that works in conjunction with @semantic-release/npm that makes releasing to the app store possible. If we stopped here, only the version in package.json would get updated, resulting in errors later on CI when deploying to the app stores. react-native-version is needed to update the versions in android and ios.1 It piggybacks off of the command used to update the package.json version and uses the same version to update android and ios files.
Make sure it’s installed and add this to your package.json:
"scripts": {
  "postversion": "react-native-version --never-amend"
  ...
}
Side note: you can add pre or post to any script and it will run before or after that script. That includes custom scripts, by the way.
The git commit
After updating the version, @semantic-release/git is responsible for staging the changed assets, committing those assests, tagging the commit, and pushing it to GitHub. But you have to be explicit about which files to add. The files listed above are all of the files that @semantic-release/npm and react-native-version changes.
The message is mostly default with one important difference. It removes [skip ci] from the end of the message. We do not want to skip CI.
Signing commits with GPG
If you already have GPG set up for signing commits 2, you may also want to enable signing commits and tags made by semantic-release. This is easy to do in our case since we’re committing from our local machine. The fix is to commit using your own name and email rather than than the default name and email used for the bot. 3 Make sure these environment variables are set to the ones matching your GPG signature:
GIT_AUTHOR_NAME
GIT_AUTHOR_EMAIL
GIT_COMMITTER_NAME
GIT_COMMITTER_EMAIL
If you opted to run semantic-release in CI, the @semantic-release/git docs explain how to sign commits on Travis.
Conclusion
Try running yarn release -d or npm run release -- -d to do a dry run of what you have so far. If everything is set up correctly, you’re halfway to single-command deployment. In the next part, we’ll discuss setting up fastlane and Circle CI, which will take care of linting, building, and actually deploying to Testflight and Google Play, as well as posting a message to Slack.
Notes
1: If you’ve used fastlane before, you may have used that to update versions in iOS and Android and are wondering why this is better. First, this does more than existing fastlane plugins. For example, while it’s easy to increment the version code in Android using a fastlane plugin, it’s not so easy to update the version name at the same time, which should really match the version we use in package.json. But the main reason to use react-native-version is using fastlane in CI is too little too late. If we tried to update versions when deploying to the app stores, we’d have to jump through several hoops to get those changes included in our git tag. We want a clean, atomic release, and git tags are perfect for that. fastlane would have to amend the commit and tag. Overall, it’s simpler to do it when updating the package.json version. You may also be wondering why we’re using fastlane on CI instead of our local machine. We’ll get to that in part 2.
2: A while back I wrote a guide on signing commits with GPG, including saving the passphrase so you don’t have to enter it every commit.
3: I ran into an issue with this. I had the environment variables defined in my .bash_profile, but wasn’t using export (e.g. export GIT_AUTHOR_EMAIL=$EMAIL rather than GIT_AUTHOR_EMAIL=$EMAIL). The reason for export is to make the variable available to other processes, like node. Make sure to use export.
